Monday 28 August 2017

Tarro de ideas para Navidad

¡Hola! 

Ya va quedando menos... sí, sí, la esperada-temida-ansiada Navidad se aproxima, y no sé a vosotras, pero a mí me suele pillar el toro con el asunto de los regalos. Más que nada, porque llegado el momento de comprar algo especial para ciertas personas, no se me ocurre nada, y cuando me atrevo a preguntarles si quieren algo en especial, siempre contestan... "Lo que tú quieras". 
Hi!

It's getting closer... yes, I'm talking about Christmas, both longed for and dreaded, and I don't know about you, but I usually end up having to think of presents for people right at the last minute. When it comes to buying something for certain people, I can't think of anything, and when I finally ask them if they'd like anything in particular, their answer is invariably "whatever you want, dear."


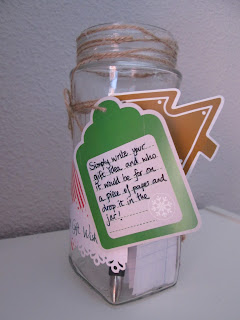
Este año, me organizo mejor. He decidido hacer un tarro de ideas, que no es más que un bote de café reciclado, decorado con temática navideña. Funciona de forma muy simple: cuando se me ocurre una idea, la escribo en la libretita que he hecho a juego, y meto el papel en el tarro. Así, cuando tenga que hacer la lista, por lo menos tengo algunas ideas. 


I'm going to be better organised this year. I've decided to make an ideas jar, which is nothing simpler than an upcycled, Christmas themed coffee jar. It's really simple: when I come up with an idea, I'll just need to write it down in the matching notepad, and put the torn page in the jar. This way, when I finally have to make my Christmas shopping list, I'll have some ideas.

No es un proyecto nada complicado. De hecho, creo que me llevó media hora en total, y aproveché unos papeles y pegatinas a juego que compré en Ikea hace unas temporadas. Aquí tenéis: 


It's definitely not a complex project. In fact, I think it took me about half an hour in total, and I used some paper and Christmas stickers from Ikea, bought some years ago. Here you are,


¿Qué os parece? 

¡Gracias por entrar en el blog!


What do you think? 

Thanks for visiting my blog!


Maite

Tuesday 22 August 2017

Happy days

¡Hola! 

Este verano hemos ido de vacaciones a una casita al lado del río Guadiana, en un entorno que para mí tiene muchos recuerdos muy emotivos de cuando era niña. Mis padres, mi hermano y yo solíamos ir al pueblo a pasar varias semanas, y mis primas se convertían en mis mejores amigas (bueno, nunca lo han dejado de ser), con quienes pasaba horas y horas cada día, y a cuyo lado vivía increíbles aventuras en las aguas mansas del río. 
Hi!

This summer, we've spent our holidays in a little house by the Guadiana river, a place that brings fond memories of my childhood. My parents, my brother and I used to go to my parents hometown for a few weeks each summer, and my cousins became my best friends (actually, they've never stopped being so), and I used to spend hours and hours with them each day, having incredible adventures in the calm river water. 


La foto que inspiró este layout fue tomada hace muchos, muchos años, cuando una de mis compañeras de aventuras y yo teníamos seis añitos, y nos la hizo mi padre en el porche trasero de la misma casa donde he pasado mis vacaciones estivales. Primero, el trabajo completo: 

The picture that inspired this layout was taken by my dad many, many years ago, when one of my partners in crime and I were but six years of age. We were sitting in the back porch of the same house where I've spent my summer holidays this year. Here's the complete layout: 


Para este trabajo, utilicé papeles de la colección Coffee in the Arbour de Maja Design. Para las capas, aproveché papel de tamaño 15x15, superponiendo recorte tras recorte. 

I used Maja Design's Coffee in the Arbour collection in this layout. I had a 6'' by 6'' stack and I built the layers by superimposing different cuttings from it. 


En la casita de campo no faltaban las libélulas. Al estar al lado del río, había cientos de ellas, y uno de nuestros pasatiempos era acecharlas para intentar cogerlas. Ni que decir tiene que no lo conseguíamos... esta libélula es un chipboard de DK Design, lleva una capa de pintura acrílica blanca, y después, gotitas de Liquid Pearls en Opal White. Podéis seguir el caminito que ha trazado volando por todo el layout. 

There was no shortage of dragonflies in the summer house. The river is so close by, there were hundreds of them, and one of our favourite pastimes was to creep up on them to try to catch them. Needless to say, we never did... this dragonfly is a chipboard by DK Design, it's been painted white using regular acrylic paint, and then I've applied Liquid Pearls in White Opal. You can follow the dragonfly's course around the layout. 


Las flores, de Dovecraft en naranja, y las perlas adhesivas, del bazar. En el fondo del layout se ven sellos de mariposas estampados con Distress Ink en Vintage Photo, y manchurrones de tinta aguada.

The flowers are by Dovecraft, in orange, and the sticky pearls, from the bargain store. I stamped some butterflies using Distress Ink in Vintage Photo on the background, and I splashed some watered down ink here and there. 


Como título del layout, elegí el chipboard "Happy days", lo pinté de blanco y le dí una capa de Liquid Pearls en Opal White. Las etiquetas son parte de la colección de Coffee in the Arbour.

I chose the chipboard Happy days for the layout title, I painted it white and then added a coat of Liquid Pearls in Opal White. The tags are part of the Coffee in the Arbour collection. 
  

Decidí darle un toque algo novedoso al diseño "colgando" la foto con cordel, y lo hice aprovechando una tuerca que me encontré en la casa (después de asegurarme de que no pertenecía a ningún mecanismo que la necesitara, claro está). 

I dedided to add a novelty touch to the layout by hanging the picture with twine, and I used a nut I found lying around (of course, I checked it didn't belong anywhere necessary first).


En las siguientes fotos, podéis ver las capas del layout.

You can look at the differente layers here.


¡Muchas gracias por visitar el blog! 

Thanks a lot for visiting my blog!

Maite

Wednesday 16 August 2017

Killiecrankie

El verano pasado, fuimos a Escocia a pasar la mayor parte del mes de agosto. La principal excusa, que me casaba :) y la secundaria, que queríamos ir a las Highlands a ver paisajes verdes. Establecimos nuestra base en el pequeño pueblo de Killiecrankie, y desde allí hicimos visitas cerca y lejos, aunque nos llovió todos los días y la temperatura no superó los 15 grados en toda la semana... y eso que era pleno verano. 


Last summer, we spent most of August in Scotland. The main reason, my wedding :) but also, we wanted to go to the Highlands to admire green landscapes. We set our base in tiny Killicrankie, and we visited different places both close by and far away, even though it rained every day and the temperature never went over 15º a single time during the week, summer though it was! 

Pero como dice el dicho, al mal tiempo, buena cara. Hice esa foto una mañana, y la verdad es que la he tenido de fondo de escritorio del ordenador, del móvil, la he enmarcado... me encanta, y cómo no, me apetecía muchísimo scrapearla. Para ello, ¿qué mejor colección que Enjoying Outdoors de Maja Design? 


As we say in Spain, you have to smile on bad weather. I took that picture one morning, and I've used it as my desktop background, my mobile phone home screen, I've had it printed and framed... I love it, and of course, I wanted to use it for a scrapbooking project. And to do this, not a better collection than Enjoying Outdoors by Maja Design, right?

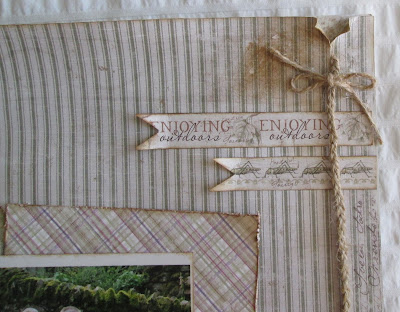
Tenía unos recortes bastante grandes, sobrantes de otros trabajos, y me pareció buena idea aprovecharlos para conseguir un layout de 30 por 30. Utilicé la troqueladora de bordes en el papel inferior, y la cenefa de saltamontes para darle un aspecto uniforme al fondo. Utilicé esta misma cenefa y la del título de la colección para añadir unos banderines, y adorné el layout con toques rústicos: un toque de chipboard de Kora Designs, un poco de tinta Distress Ink en Vintage Photo, y el toque de la parte de la derecha con una trenza de cordel, un botón de imitación de hueso, y los tres cordeles abiertos en abanico. Por último, una tarjeta de journalling de la misma colección, con el lugar y la fecha escritos a mano con una pluma de caligrafía. 


I had some good-sized remnants from other projects, and I thought it would be a good idea to combine them to achieve the standard 12 by 12 inch size. I used an edge punch on the bottom half, and a grashopper strip on top for a tied-together look. I used this same strip, and the one for the collection title, for banners. I was after a rustic feel, so I added some chipboard by Kora Projects, and some Distress Ink in Vintage Photo all over the layout. On the right-hand side, a braid of twine, a bone-looking button, and the same three lengths of twine fanning out at the bottom. Last, a journalling card with the place and time of the picture, handwritten using a calligraphy pen.

Te dejo algunos detalles de la composición. ¿Qué te ha parecido?


I'll show you some other details in the layout. What do you think?

¡Gracias por entrar en el blog! 


Thanks for popping in!


Maite 


Thursday 3 August 2017

Enjoy the little things

¡Hola!
Han comenzado las vacaciones de verano y, aunque estamos lejos de casa, me he traído todas mis cositas para hacer scrap y así ir mejorando mi técnica. A lo mejor participar en retos a estas alturas es como empezar la casa por el tejado, pero me parece que la mayoría de los retos acaban proponiendo paletas de colores que funcionan, o sketches bonitos, y tener guías siempre es bueno para aprender.
Por eso, cada pocos días consulto diversos blogs para saber qué retos proponen, y este mes participo en dos retos. En primero, del blog de Gargamellscrap, propone lo siguiente:
- componer un layout mixed media
- una paleta de colores: turquesa, rosa, crema, azul, violeta....
- textura
- chipboard
- flores
- elementos textiles
El segundo, de Jo Quezada de FSN (http://www.fiebredescrapbook.com/2017/08/reto-personal-jo-fondo-diy.html?m=) requiere un fondo DIY. 
Paso a presentar mi participación en ambos retos. 
Aprovechando que en mi última compra scrap me llevé a casa Distress Ink en Evergreen Bough y Picked Raspberry y un stencil de Tim Holtz que tenía muchísimas ganas de probar, cogí una cartulina blanca y me puse a estampar. Además, mezclé gesso con pintura acrílica violeta y apliqué otro stencil de Gabrielle Pollacco en la esquina superior derecha.
El resto de la composición es simple: flores de Dixi Blooms, Dovecraft, Paper Blooms de Kaisercraft y de la colección Darjeeling de Petaloo. Los chipboards son del bazar local y he de decir que ¡me encantan!
Utilicé gasa por debajo de la foto y también arpillera. Queda fenomenal y además así también cumplo con el requisito de usar textiles en el layout. Adorné los bordes con lentejuelas transparentes, rosas y violetas de forma algo azarosa en el lateral y la zona inferior de la fotografía.
Por último, el título es un sticker de 13@rts, de la colección Out of the Blue.
¿Qué os parece? ¡Espero que os guste!
¡Mucha suerte al resto de participantes!
Gracias por entrar en el blog :)
Maite